If you are reading these rules for the first time, ignore the text along the right hand side. These rules serve as a summary to help you quickly familiarize yourself with the game.
Setup
1. Player Decks
Each player should shuffle their deck and place it face down in front of them.
1. Player Decks
Each player takes a deck of 20 sleeved starting cards (cards belonging to a specific deck are denoted by their
card back). Each player’s deck should have 9 Cursed Land, 3 Fertile Soil, and 8 blank cards. Each player should
shuffle their deck and place it face down in front of them.
2. The Commons
Take out all the Fertile Soil advancements and place them in a separate deck.
Separate all the other advancements into decks denoted by their level symbols.
Shuffle all of the level 1 advancements and count out a number of
advancements into a deck based on the number of players:
- players – count out 12 advancements.
- players – count out 15 advancements.
- players – count out 18 advancements.
Then turn over the first 3 advancements of the level 1, 2 and 3 deck .
2. The Commons
The commons is a set of 9 advancements available to buy during the game in the center
of the table. To set this up, you first take out all the Fertile Soil advancements and place them
in a separate deck. Then separate all the other advancements into decks denoted by their
level symbols (see "Card Anatomy").
Level 1 Advancements:
Shuffle all of the level 1 advancements together. Then count out a number of
advancements into a deck face down and put the rest back in the box. The number of
advancements in the deck is based on the number of players in the game, which is
listed below:
- 2 players – count out 12 advancements and leave the rest in the box.
- 3 players – count out 15 advancements and leave the rest in the box.
- 4 players – count out 18 advancements and leave the rest in the box.
Then turn over the first 3 advancements of the deck as shown in the setup diagram.
Level 2 Advancements:
Use all of the level 2 advancements, then turn over the first 3 advancements of the deck.
Level 3 Advancements:
Use all of the level 3 advancements, then turn over the first 3 advancements of the deck.
3. Vale Cards
Shuffle both vale decks, then turn over 4 cards face up from each deck.
3. Vale Cards
Separate the vale cards into a level 1 deck and a level 2 deck. Shuffle the level
1 deck and turn over 4 cards face up, then do the same with the level 2 deck.
5. Setup Fields
Each player makes their starting field until they have two Cursed Lands in their field
and a third one on-deck.
5. Setup Fields
During the game you will always have 20 cards. Your cards will be in one of four locations: your
deck, your field, your discard pile, and you will have one on-deck card.
During setup, players will create their starting field and on-deck card.
Each player makes their starting field using the following steps:
- Shuffle your 20 card deck and place it face down in front of you.
- Turn over the top card of your deck and place it back on top of your deck face up. This is your on-deck card.
- Place your on-deck card in your play area, creating the start of your field, then turn over a new on-deck card.
- Repeat step C until you have two Cursed Lands in your field and a third one on-deck.
6. Determine Starting Player
Place the  tokens so that their
active side is face up and shuffle them. Each player takes one token at random and turns it over
so the spent side is face up. The player with the starting player symbol will be the starting
player for this game.
tokens so that their
active side is face up and shuffle them. Each player takes one token at random and turns it over
so the spent side is face up. The player with the starting player symbol will be the starting
player for this game.
6. Determine Starting Player
Take a number of (mana) tokens
equal to the number of players and be sure to include the token with the starting player symbol.
Place the tokens so that their
active side is face up and shuffle them. Each player takes one token at random and turns it over
so the spent side is face up. The player with the starting player symbol will be the starting
player for this game.
Players are now ready to begin the game!
Players are now ready to begin the game!
End of the Game
End of the Game
When the  tokens
in the pool run out, or the last Level 2 vale card is put into the commons during
a Discard phase, finish playing the current round so that each player gets
an equal number of turns, then the game ends.
tokens
in the pool run out, or the last Level 2 vale card is put into the commons during
a Discard phase, finish playing the current round so that each player gets
an equal number of turns, then the game ends.
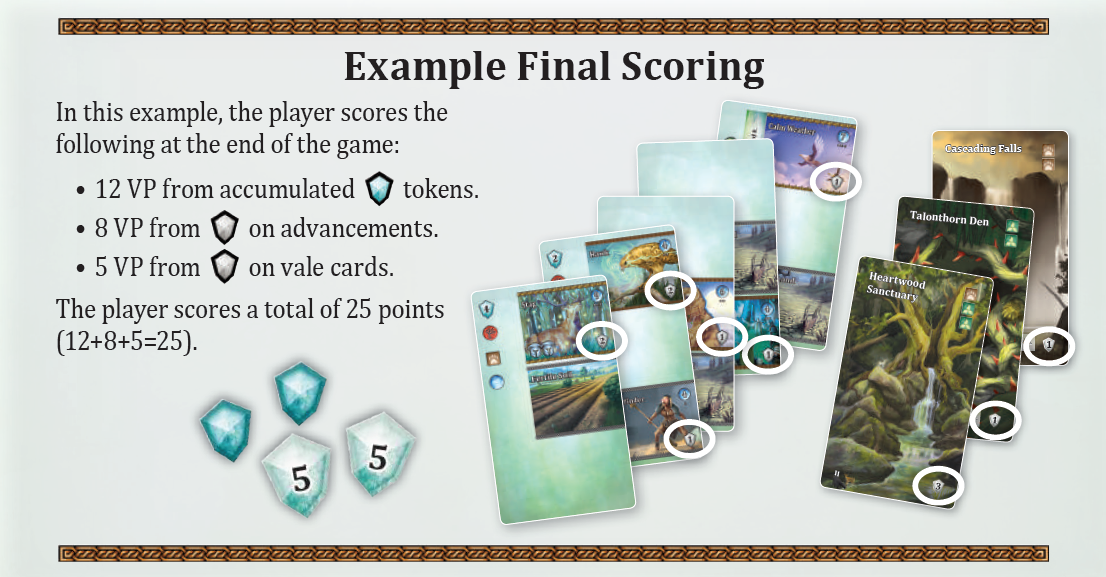
Count your .
The player with the most total points is the winner. If two or more players are tied,
the player with the most combined level 3 advancements and level 2 vale cards is the
winner. If there is still a tie, then players share the win.
The game may end in two possible scenarios:
A) When the tokens
in the pool run out, finish playing the current round so that each player gets
an equal number of turns, then the game ends. If
tokens in the pool run out and a player would still gain
, take them from
the tokens that were left in the box.
B) When the last Level 2 vale card is put into the commons during a Discard phase,
finish playing the current round so that each player gets an equal number of turns,
then the game ends.
Should the vale cards not be worth any VP
anymore, players can of course exchange all their spirit symbols 3:1 into
which are
taken from the tokens that were left in the box.
Players now count their points.
You may have accumulated
tokens from cards that give you tokens each time you play them.
Some advancements are worth points at the end of the game, which is indicated by
the gray  symbol on the right side of the card. You should go through all of your cards and
count up all the
you have on advancements.
symbol on the right side of the card. You should go through all of your cards and
count up all the
you have on advancements.
Many vale cards are also worth points at the end of the game, which is indicated
by the gray
symbol on the right side of the card.
The player with the most total points is the winner. If two or more players are tied,
the player with the most combined level 3 advancements and level 2 vale cards is the
winner. If there is still a tie, then players share the win.
Additional Rules
This section covers additional explanations beyond the basic rules required to play.
Mana Token
You may only spend your active
token during
your Harvest Phase.
If you choose not to spend your active
token, it will
remain active for your next turns until you spend it.
If your token is
already active and you Spoil, the
token remains active but you don’t receive any other reward.
Guardian Symbol
 Some cards have one or more
(guardian symbol).
Some cards have one or more
(guardian symbol).
These symbols have no effect unless an ability on a card references them.
Wild Spirit Symbol
The  (wild spirit symbol) is considered any of the spirit symbols:
 ,
,
 ,
,
 ,
.
,
.
If a vale card shows a
 in its
cost, you may use any spirit symbol to pay that cost.
in its
cost, you may use any spirit symbol to pay that cost.
If a card or ability gives you a
,
you may use it to pay for any spirit symbol on a vale card’s cost.
On-deck Card
Your on-deck card is not considered to be in your deck or in your field. Abilities
that reference your deck, like "search your deck", do not include your on-deck card.
The only symbols that count on your on-deck card are
 and
and
 symbols.
You must play the card into your field to get any other symbols on the card.
symbols.
You must play the card into your field to get any other symbols on the card.
"Harvest" and "When Played" abilities cannot be used on your on-deck card. "Ongoing"
abilities however, continually affect the card even when it is your on-deck card.
Using Abilities
If an ability specifically contradicts the rules, the ability takes precedence.
Each ability on an advancement or vale card can only be used once per turn
unless it specifically states otherwise.
Most abilities list when they can be used at the start of their text, like "Harvest"
or "When Played" for example, otherwise the ability describes when it can be used.
If two or more abilities would resolve at the same time, like two "Harvest"
abilities for example, the active player chooses the order they are resolved.
"When Played" abilities are resolved when they are played into your field,
before revealing a new on-deck card; they are not resolved when they are
revealed as your on-deck card.
"Harvest" abilities in your field are resolved during your Harvest Phase;
they are not resolved while they are your on-deck card.
"Ongoing" abilities continually affect the card whether that card is
on-deck, in your field, in your discard pile, or in your deck. These effects
have no trigger, as they are always active.
With the Vale of Magic expansion, there are two more types of abilities:
"Discard" abilities are resolved during your Discard Phase.
"When Bought" abilities are resolved the moment the card is bought
and then can be ignored for the rest of the game.
Planting Your Field
New cards that are added into your field must always be placed to the right of
any cards previously placed in your field. The cards are designed such that those
without text effects can be overlapped and only the left half of each card
needs to be seen. Try not to overlap cards with "Ongoing" or "Harvest" abilities,
or you may miss them.
Open and Hidden Information
You may not look at any cards in a deck unless an ability allows you to do so.
You may always look at any cards in your own discard pile. You may not look at
cards in other players’ discard piles unless an ability allows you to do so.
When you gain
tokens they are placed in your play area and are open information to all players.
Decay
You can only Spoil during your Planting Phase and Prep Phase. If you have 4 or
more revealed
during your Harvest Phase or Discard Phase, you do not Spoil and there is no effect.
Card vs. Advancement
A card is comprised of everything in its sleeve, including the starting card
itself and any advancements that are placed in the sleeve.
An advancement is one of the three "slots" that make up a card; advancements are
not counted as individual cards. Advancements that are printed on starting cards
are still considered an advancement in regards to rules and abilities.
The "blank" starting card is not considered an advancement.
The starting player has the Mana token with the star


.
The first row of the player info of each player contains some useful views.
If you click on the single card back

, the whole deck of that player is shown.
For the player himself these cards are marked at the top: with a blank card if the card is the current on-deck card (red border) or is part of the field (green border) and with a card back in case the card is currently discarded.
If you click on the symbol for the field view

, the current player area of that player
is shown in the bottom of the screen. The number on the left card denotes the number of cards in the draw pile (incl. on-deck card) and the number on the right card denotes the current number of cards in the player's discard pile.
If you click on the vale card back

, the vale cards of that player are shown.
The ability of vale cards bought this turn are not available, so those cards are shown turned around 90° and are given as +X in the number of cards.
Vale cards whose ability has already been used have a small red cross on their ability. That only affects abilities you explicitly have to chose using.
The second player info row shows the values for the current field of that player. Ongoing abilities of advancements and
vale cards are always automatically included and shown.
The list of the player's spirit symbols contains, apart from the symbols
,
,
and
,
another symbol
, which you can also find as cost on the vale cards.
Here it is shown how many
unspecified symbols you already used during your Harvest Phase,
so you don't have to decide at the time of paying which of your symbols you'll use for the unspecified cost.
If you want to calculate your currently available spirit symbols, you have to deduct the number beside that symbol.
Vale cards whose ability is not used automatically you can choose as soon as the ability becomes usable.
In this case a clickable card back will be shown beside the vale card display. If you click this, you get a popup where you can choose the respective vale card.
Specifically the usage of the "Conclave of Ents" is only offered if the field has actually been spoiled.
Advancements whose ability is not used automatically you can choose as soon as the ability becomes usable.
In this case the usable ability will be shown with a red frame.
To prevent clicks which cannot be undone, you usually need 2 clicks to play your on-deck card during your Planting Phase: one click to play the on-deck card
and another one to reveal the next one in the stack.
Usually the Prep Phase is executed automatically. But if there are usable abilities (usually "When Played" abilities), you explicitly have
to click on the deck to reveal the next card. This enables you to undo use of the ability.
Therefore you always have to conclude the Prep Phase explicitly with the "Finish Turn" button.
Usually in the bottom of the window the playing area of the player currently on turn is shown, so you can easily follow what that player is currently doing.
If you want to look at your own (or a different player's) field instead without being disturbed by the current player's actions, you can freeze the current
field view with the pin in the upper right corner of the field.
Usually you have to click on your deck to reveal the next on-deck card. But the player on turn may perform this action automatically with
3 or less decay in his display. To accomplish this, just activate the checkbox below the draw pile ( < 3
).
Attention: If you have cards with 2 or more active decay, this option may cause your field to be spoiled. In that case
it is better to un-check that option.
Vale of Magic expansion:
As usual, abilities are used automatically if no choice is needed by the player:
For the vale card Manadew Meadow, the card in the field with the most guardian symbols is chosen automatically as target; Conclave of Ents is being considered in that choice.
Amberwood, Direwolf Burrow and Shimmercliff Rookery:
In case the player's mana token is face down, it is turned face up.
If it is face up already, the system assumes that the mana token is turned face down first before buying the vale card, and adds the appropriate amount of mana to the mana pool before turning it face up again.
Sunwell Temple:
Since the additional vale card is not available in the same turn, it is shown turned around 90° as any other just bought vale card.
Wood Sprite Hoard:
The revealed and not discarded cards are marked in the deck overview. The symbol is a card's backside with a number which shows the order of the card in the remaining deck.
Aether Tree + Seedling
If the Aether Tree is used on a card with a Seedling, it is assumed that the Seedling first cancels all decay from Cursed Lands
and the last decay left is one from another advancement, if such exists, which could then be cancelled by the Aether Tree.
The Hatchery cannot be used in the same turn in which it was bought, despite it being a Discard Ability.
This was clarified by the Author on bgg.
Possible settings:
show animations: device dependent, standard: checked
If this option is checked your browser will animate all actions.
Pin playing area when opening window: device dependent, standard: unchecked
This option will check the pin to freeze the field view to a player.
Planting phase: Reveal on-deck card automatically with less than 3 decay: device dependent, standard: unchecked
With this one checked the option for automatically revealing cards in planting phase with less than 3 decay on display will be checked.